

How To Find Ip Of Amcrest Camera
Configure Amcrest Network Cameras for Cloud Recording, Backup, Monitoring and Playback
Contents
Introduction
Step 1: Connect photographic camera to the network and find IP accost
1.1 Connect photographic camera to the network
i.two Find the Camera's IP Address
Step 2: Configure the Camera Using the Spider web-based Configuration Tool
2.ane Setup or Re-configure Wi-Fi
Step 3. Configure the FTP settings
Step 4. Configure Video or Paradigm Snapshot Settings
4.ane Configure Video / Image Settings (Resolution, Frame Charge per unit, Bit Charge per unit)
4.two Configure Image Snapshot Settings
4.3 Configure Motion Recording for both prototype and video recording
4.iv Configure continuous video/image recording
5. CameraFTP Viewer
Introduction
Amcrest has wired and wireless, HD 720P, full HD 1080P, 3MP and 4MP, indoor and outdoor network cameras. Overall Amcrest cameras take very good build quality.
Amcrest cameras are fully uniform with CameraFTP'southward cloud recording service. Older models of Amcrest cameras tape video clips in a proprietary video format of .DAV, which can only be played by Amcrest Smart Player; new models have supported .MP4, which can exist played in all spider web browsers and CameraFTP Mobile Viewer apps. If your camera records in .DAV format, delight try to upgrade to the latest version firmware.
Amcrest cameras also support image recording, which is similar to video recording. The recorded images tin can be played like video with lower frames per second and no audio support (most ourdoor cameras don't support audio recording anyway).
If yous demand a local CCTV/DVR system to display the live video, y'all can use a PC running CameraFTP VSS. CameraFTP VSS can connect to multiple live video streams, brandish them on a monitor and tape video clips (.MP4) to the deject.
Basic camera information
| Video / image resolution | 1280x720, 640x360, 1920x1080, 3M, 4M |
| Audio recording | Supported (for indoor models) |
| Epitome upload frequency | ane paradigm/s to one image/5000s |
| Video frame charge per unit | 1,2,3,...,30 fps |
| Nighttime-vision | Indoor cameras upward to 24 feet. Outdoor 98ft |
| Paradigm snapshot recording | Supported |
| Video clip recording | Supported. |
| Move detection | Supported for both epitome and video clip based recording |
| Continuous recording | Supported. |
| Supported video format | .DAV (Proprietary format that requires Amcrest's own Smart Player) |
| Connectedness type | Camera dependent, some supports Wi-Fi and Ethernet cablevision |
| PoE (Ability on Ethernet) | Some outdoor models |
| Indoor / outdoor | Both indoor and outdoor models |
| Everyman pricing (as of 7/11/2016) | From $74.99 |
Note: This certificate is non designed to supervene upon the product manual from the manufacturer. The data provided is based on our knowledge of the model Amcrest IPM-721S, IPM-721B and IP3M-943B. It may non be authentic or completely upward-to-appointment. Users shall contact the manufacturer for all photographic camera-related issues and contact us only for CameraFTP-related (cloud service / FTP) issues.
Most of the setup steps below are camera related and are very trivial. If you have finished these basic steps before, and then y'all can skip Steps one and 2.
Pace 1: Connect photographic camera to the network and find IP address
ane.ane Connect camera to the network
At that place are 2 or three ways to connect the IP camera to the Wi-Fi network. Please read the production manual for detailed instructions.
(1) Connect the camera with the router using an Ethernet cable beginning. Yous tin configure the Wi-Fi settings in the camera's configuration pages later.
(two) If your Wi-Fi access point/router supports WPS and the camera model supports WPS, then it is very easy to connect your device to the wi-fi network:
Plow on the photographic camera and printing the WPS push button on your Wi-Fi access bespeak (router) for 3 seconds; the WPS button volition commonly start flashing. Next, quickly press the WPS button on your photographic camera (sometimes you need to concur for nearly half dozen seconds). In about 1 infinitesimal, you lot will see the status/network lite change, indicating it is connected to the wireless router.
1.two Find the Camera's IP Address
Please refer to the manufacturer's transmission for more detailed information. Ordinarily you will run the included IP Camera Search Tool to detect the photographic camera. If your reckoner does non have a DVD/CD drive, then y'all can use CameraFTP VSS software or CameraFTP Camera Configuration Tool to find the camera's IP address (without using other cloud recording features).
If your photographic camera is continued to the Wi-Fi router, or if you accept connected the photographic camera with a router using an Ethernet cable, yous can run the manufacturer's setup program to observe the camera's IP accost. From a PC in the same network, insert the camera's software CD. Browse the content of the CD and run IPCamSetup.exe, it will install the necessary software for the camera. After it is finished, run the installed IP Photographic camera Tool and information technology will launch a tool to detect Amcrest cameras.
If you don't accept the manufacturer's software or if y'all don't have a CD/DVD drive, you tin apply CameraFTP VSS software to find the camera'due south IP address:
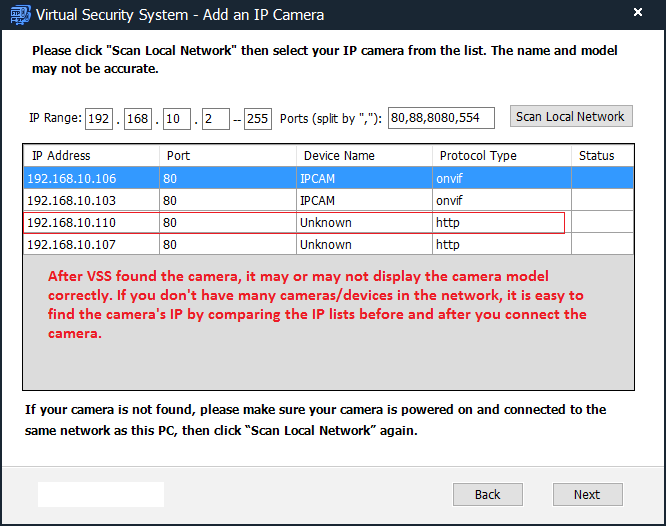
Amcrest cameras use two divide IP addresses for wi-fi and wired connections. After yous switch to wi-fi network, if y'all disconnect the network cable, you demand to search the camera again to find the new IP address.
Pace 2: Configure the Photographic camera Using the Spider web-based Configuration Tool
One time yous've institute the camera's IP address, y'all tin can open Microsoft Internet Explorer or Firefox to access the camera's configuration site by inbound the following URL: (Please don't use Chrome or Border)
http://IP_ADDRESS/
Information technology volition open the logon screen equally shown beneath:
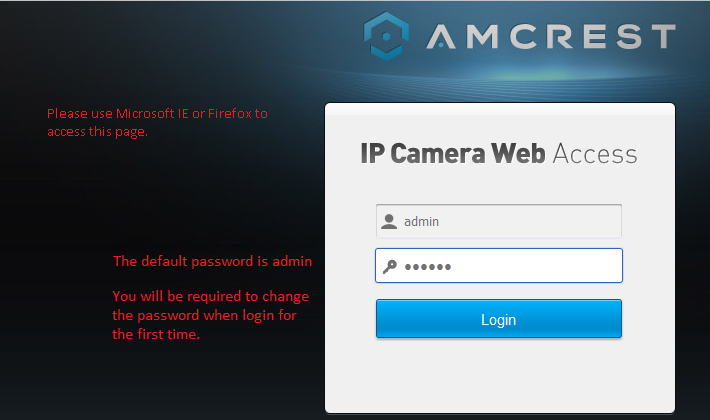
The default username is: admin, the password is admin. Y'all volition be required to change the password when log in for the first time.
You will also need to install the ActiveX/Plug-in:
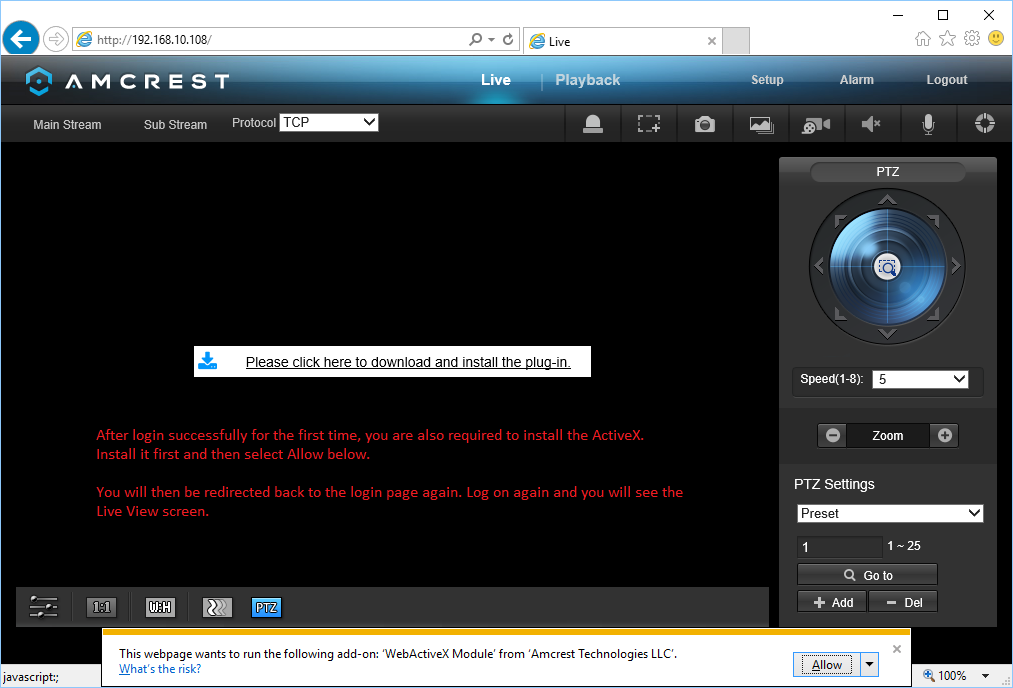
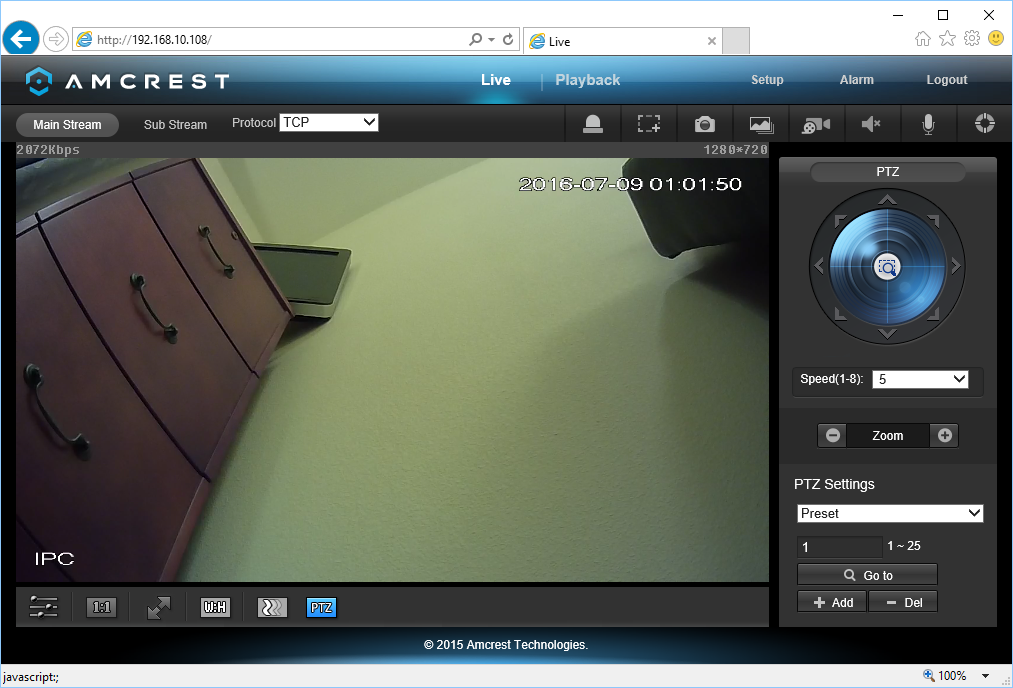
Install the ActiveX and Subsequently logon, y'all will run into the alive view screen:
With CameraFTP's service, nigh regular setup steps are not required. (You can check the basic setup steps to run into if y'all need to configure non-CameraFTP related settings.
two.one Setup or Re-configure Wi-Fi
If y'all had already connected the photographic camera with your wireless router, or if you just want to apply the wired/PoE connection, then skip this footstep.
Otherwise, click the Network tab, so click Wifi, you will see the screen beneath.
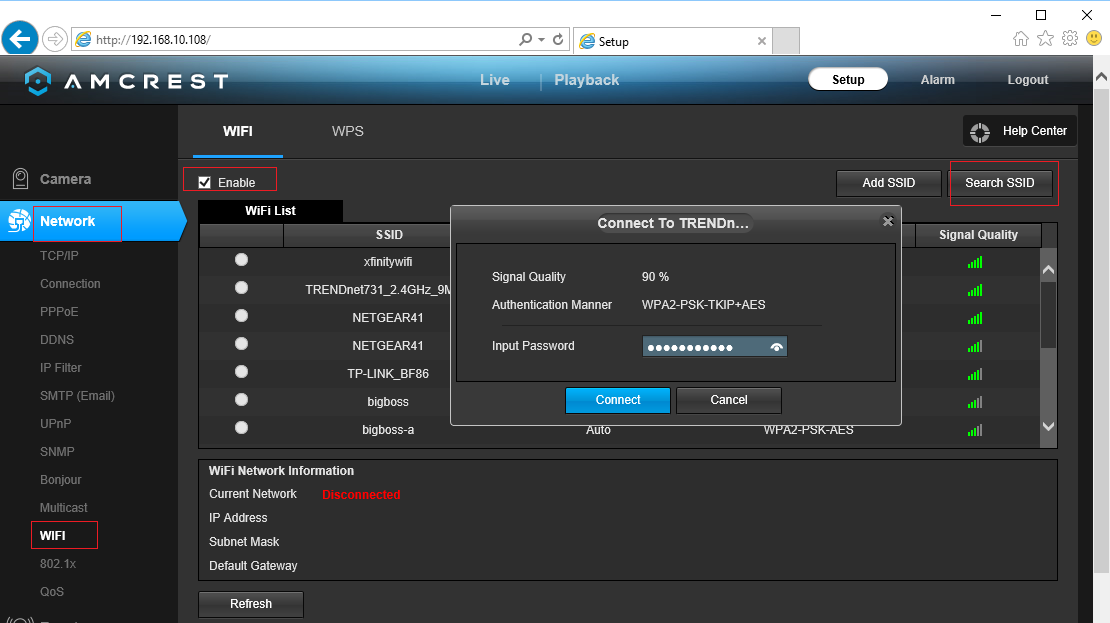
Click Enable and then "Search SSID" to detect all available Wi-Fi routers, then select one to connect. Enter the wireless countersign, click Connect.
If Wi-Fi is configured successfully, you can unplug your network cable later on. Amcrest cameras utilize 2 unlike IP addresses for the wired and wireless connections.
Pace three. Configure the FTP settings
Click Storage --> Destination --> FTP, you can see the screen as follows. If you don't have an account on CameraFTP, please visit www.cameraftp.com and sign up a free trial account. CameraFTP offers iii-24-hour interval gratis trial. After that, you need to order a subscription to continue using the service.
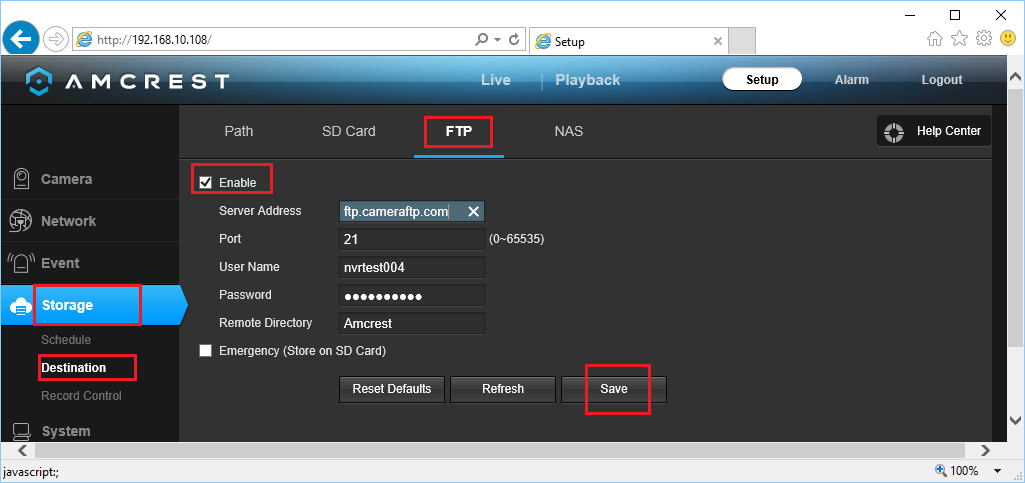
Assuming y'all already have a CameraFTP Account, then you need to enter the following info:
- FTP Server: ftp.cameraftp.com or 66.220.9.45
- Port: 21
- Username and Countersign:
The username is the same as your cameraftp.com username. The password is the photographic camera license key. Please make sure to add a photographic camera on world wide web.CameraFTP.com website, and you lot tin can find the photographic camera license there. For quick testing, you tin too use your CameraFTP password.
Note: In the above screenshot, "Amcrest" is the Remote Directory/Binder Name, which is the same equally the camera name that you lot created on www.CameraFTP.com website when yous added a new camera.
Click Save to salvage the settings. Later that, you need to configure the storage destination for FTP. Click Storage --> Destination --> Path as shown beneath:
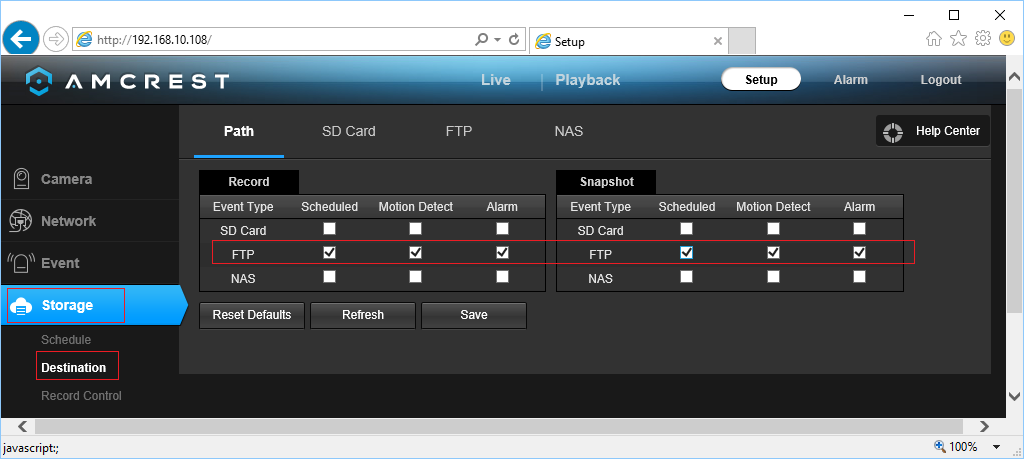
Check the FTP option every bit shown in a higher place for "Scheduled" (continuous) and "Move Find".
Pace 4. Configure Video or Image Snapshot Settings
Based on your subscription, you lot only need to configure video settings or epitome snapshot settings. You shall non configure both settings, otherwise, you need to order two dissever camera licenses.
iv.i Configure Video / Image Settings (Resolution, Frame Rate, Bit Rate)
If y'all ordered a video plan, and so yous tin can click Camera --> Video --> Video as shown below. (Otherwise, you only demand to configure the video size.) Usually yous but need to configure the Primary Stream Video Settings.

Select the Code-Stream Type to Motion if you ordered a motion recording program; select Full general if y'all ordered a continuous recording programme. Encode Mode is better to exist H.264 (i.e. Mainline. But H.264B (baseline) and H.264H (highline) probably are too fine.)
The resolution and frame charge per unit should be based on the plan y'all subscribed to. If yous use Wi-Fi connection and if you have multiple HD cameras, it is recommended to fix the frame rate to 2-5 fps. Otherwise, your wi-fi network could become too slow.
Frame Interval is unremarkably set to be 2 - iv times of the frame rate, but not less than 5;
The Fleck Rate is a little tricky. Setting it too high volition use too much bandwidth, thus dramatically slow down your network, causing failed uploads; setting it too low volition touch the video quality. You lot can apply our bandwidth calculator to estimate the bandwidth. Visit www.cameraftp.com, click Pricing, and then customize a service program. Run across the screenshot beneath.
Note for estimating the bandwidth, the number of cameras should be set to 1.
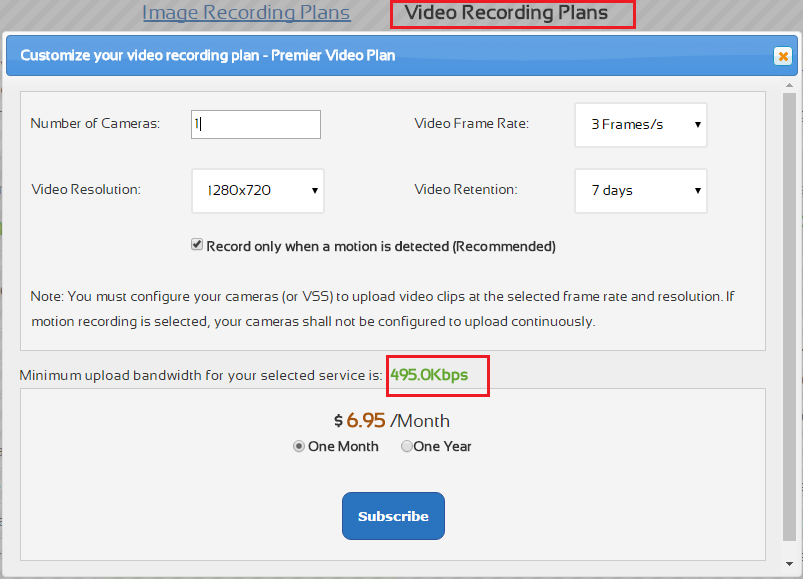
For the video plan of 1280x720, 3 frames/southward, the estimated bandwidth is 495Kbps.
If you ordered an image plan, and then yous only need to select the right video resolution. The resolution of the prototype snapshots will be the aforementioned as the Principal Stream video.
Click Salve to salvage the video settings.
four.ii Configure Image Snapshot Settings
If you ordered an image programme, and then you should configure Image Snapshot Settings. (Otherwise, skip this step). Click Camera --> Video --> Snapshot, y'all will see the screen as follows.
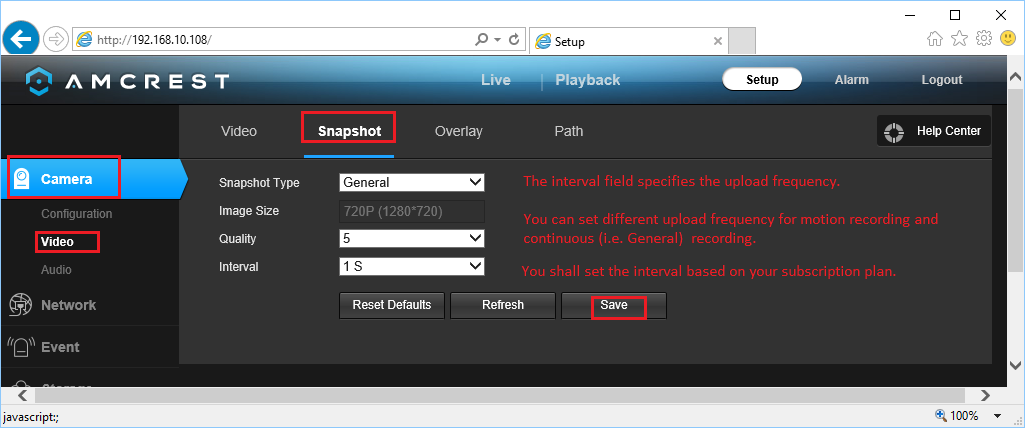
- Snapshot Type:
For continuous recording, select "General"; later you need to configure Record Schedule.
For motion recording, select "Motion"; you will also need to configure Event --> Motion Detect, and motion detect schedule.
If your subscription is for i image/2 seconds, then enter 2 in the "Interval" field.
4.3 Configure Move Recording for both image and video recording
Click Event --> Video Observe --> Motion Detect equally shown beneath:
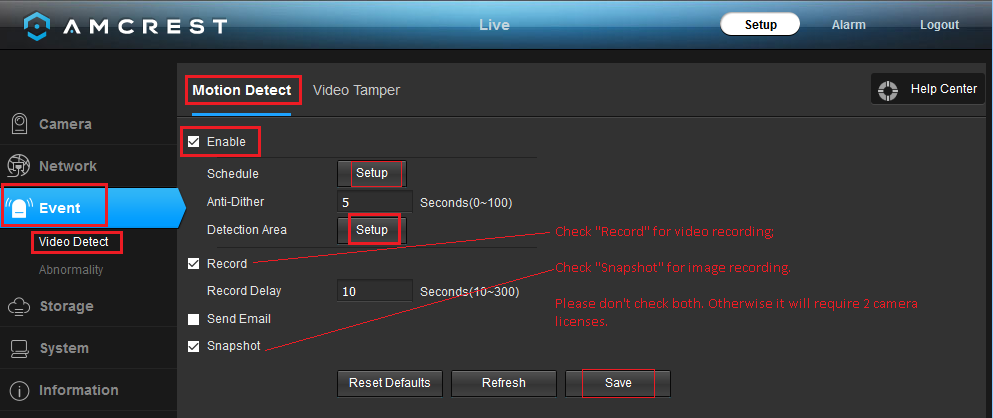
Cheque "Enable. If you lot ordered a video recording plan, then check "Tape"; otherwise, bank check "Snapshot". Please do not check both; otherwise you will need two camera licenses.
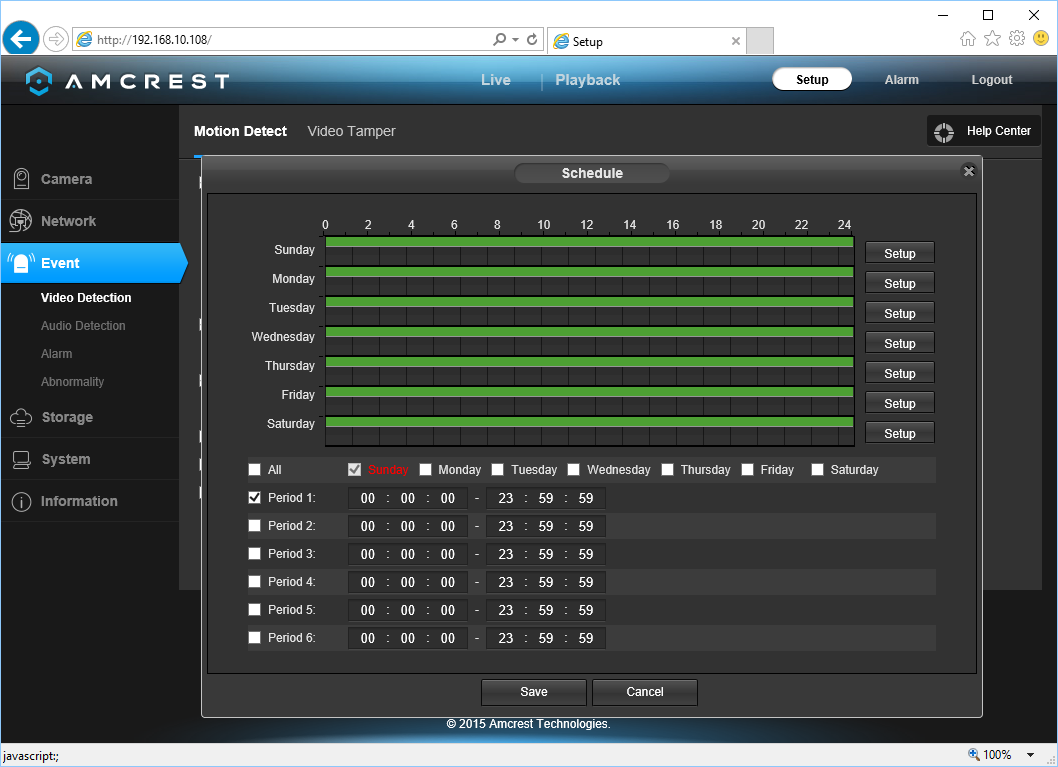
Y'all also need to click Schedule "Setup" push to select a motion detection schedule. Unremarkably you volition select all times as shown below:
Lastly, yous must set a motion detection area. This is very of import. If it is not set, then movement-triggered recording will non work! Click Detection Area "Setup" push button, it volition display:
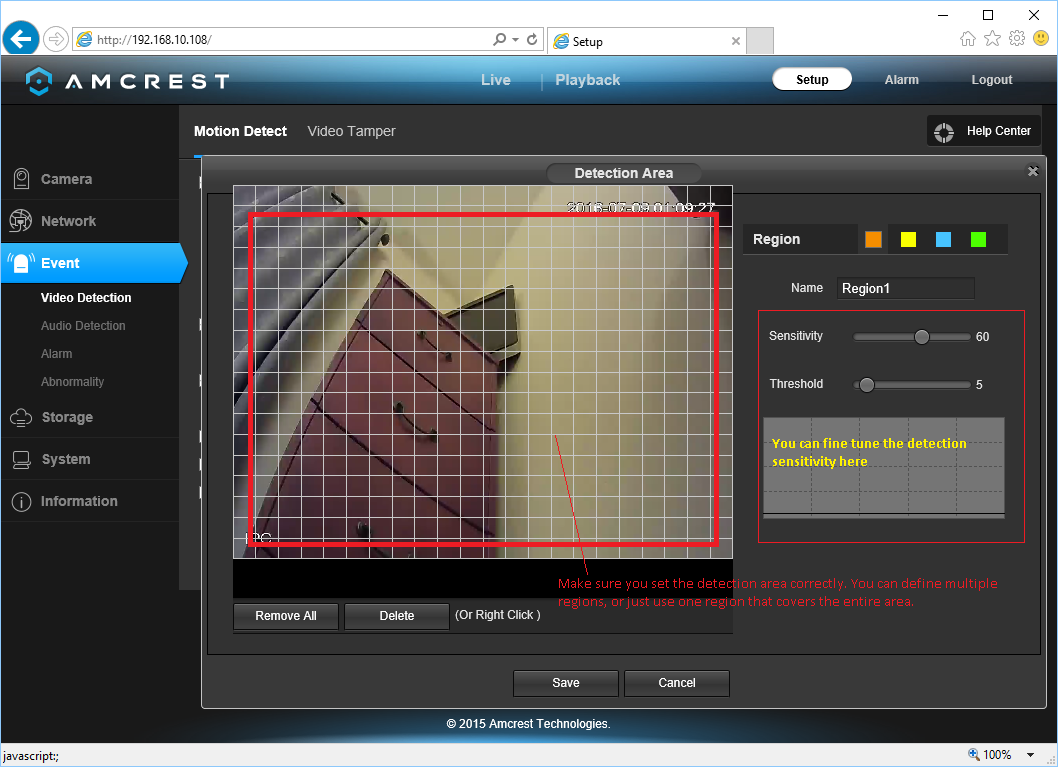
Please read the detailed instructions in the screenshot. If move recording does not work, make sure you verify this has been gear up correctly. Click Relieve to save the settings.
four.4 Configure continuous video/image recording
Click Storage --> Record Command, yous will come across the screen equally follows.
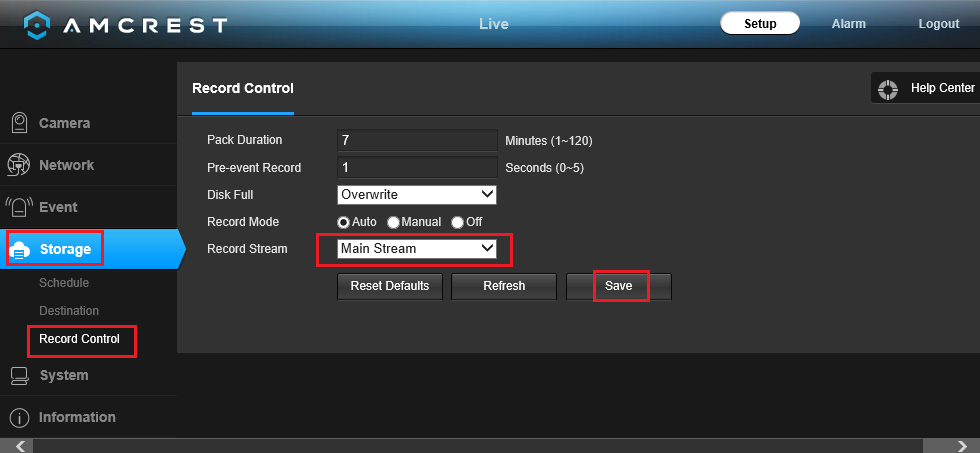
Click Save to relieve the change.
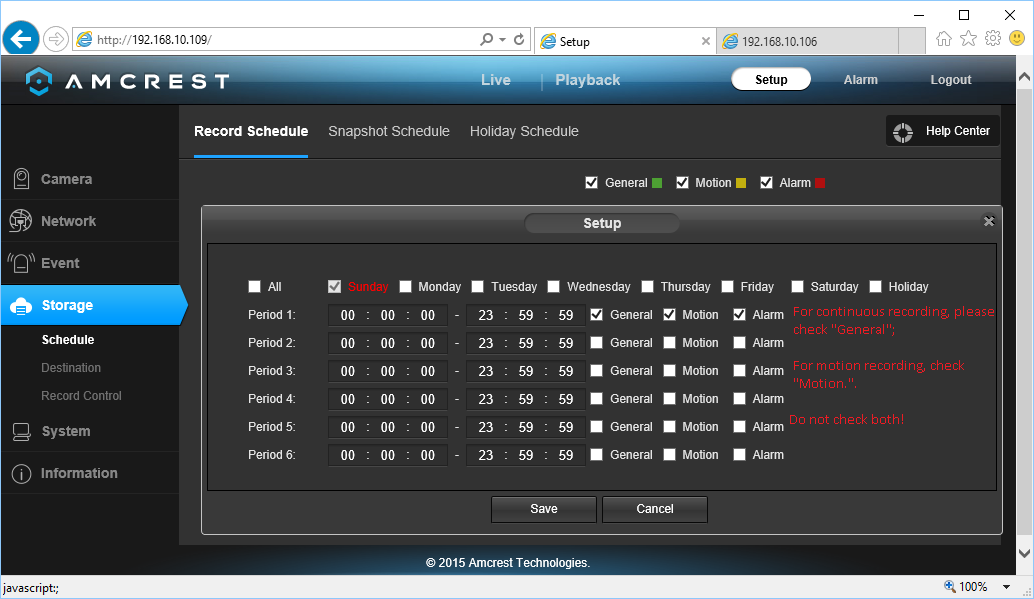
For continuous video recording, y'all need to set video recording schedule:
Click Storage --> Schedule --> Record Schedule as shown below:
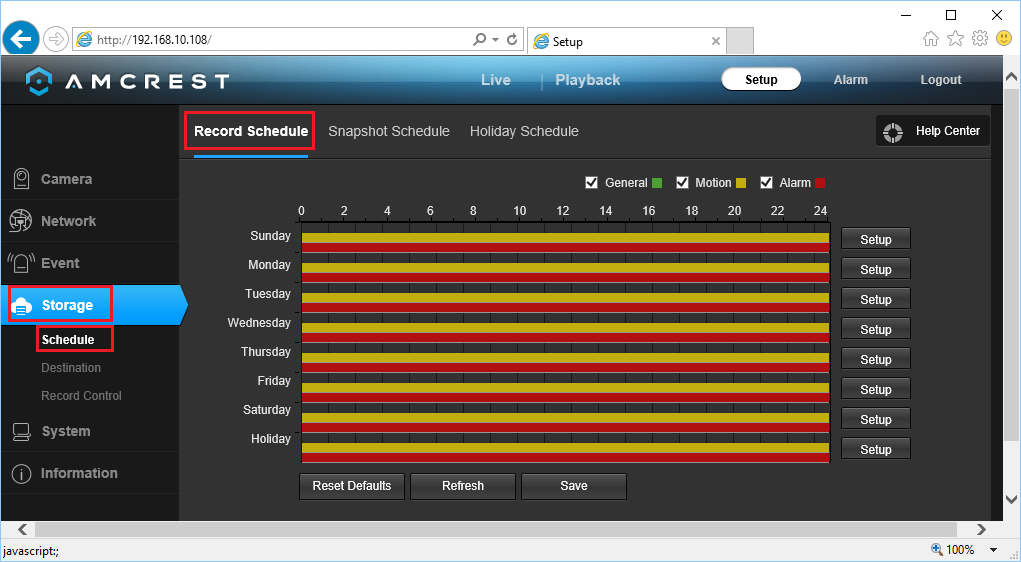
Based on your plan, you might need to setup the schedule as follows:
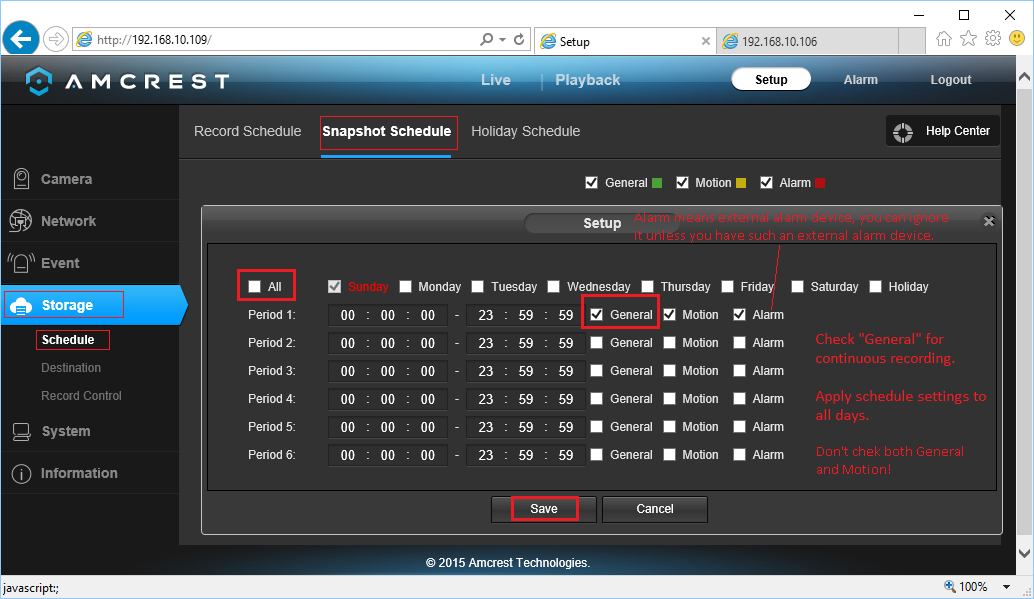
For continuous image recording, you lot need to set snapshot schedule:
Click Storage --> Schedule --> Snapshot Schedule as shown below:
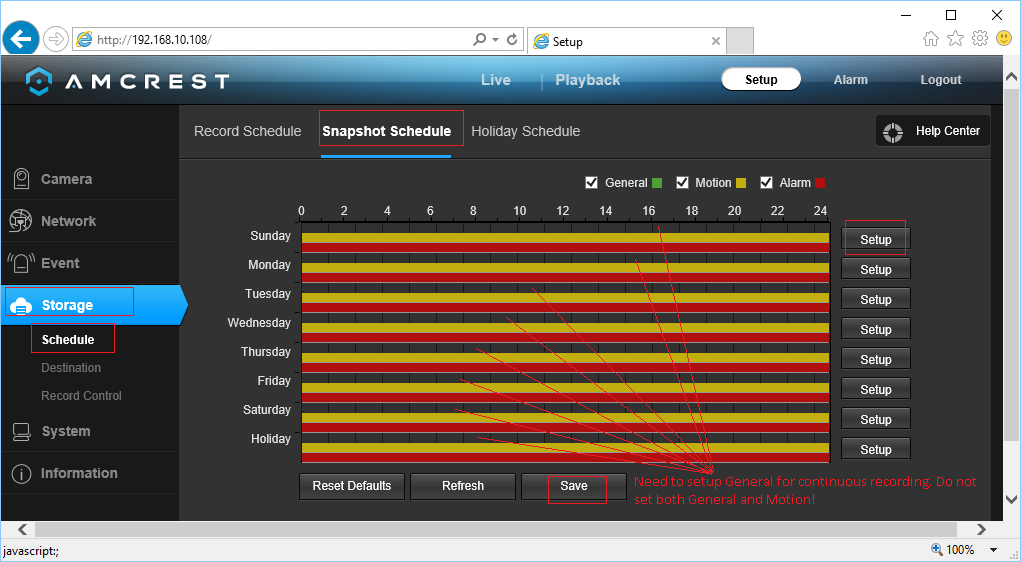
Based on your plan, you might demand to setup the schedule as follows:
NOTE: Please do non configure both continuous (General) and motility recording. It will exist considered as two camera licenses; too exercise not configure both image and video recording!
Y'all are all done!
Note: Please exercise non cheque both "Take snapshots" and "Recording" in the Move Detection screen. It will be considered 2 dissever camera licenses.
5. CameraFTP Viewer
You can disconnect the Ethernet cable if you lot want to use Wi-Fi. If you need to make changes, y'all can run the setup program once more to discover the camera's IP address (as information technology may change with DHCP), and then access the camera's Configuration pages.
Afterwards your camera is setup, you can visit www.cameraftp.com to live monitor or play back your recorded footage from anywhere. Y'all can likewise download CameraFTP Viewer App for iOS, Android and Windows Phone.
Notation: Older models of Amcrest cameras upload video clips in .DAV format, which is a proprietary format incompatible with most of video players. CameraFTP browser based viewer and mobile viewer apps cannot play it. Please upgrade the camera firmware to the latest version. New models support .MP4, which is universally supported. Uploading prototype snapshots is as well universally supported. Amcrest cameras are compatible with CameraFTP VSS-based CCTV Live View, Cloud Recording and Local Recording. If y'all use VSS for video recording, it is of import to gear up the correct video size, frame rate and flake rate in Video Profile Settings.
Cannot get it to work? Please read our Trouble-shooting Guide.
Source: https://www.cameraftp.com/CameraFTP/Support/Amcrest_FTP_CloudRecording.aspx
Posted by: taylorhimbeyer.blogspot.com
0 Response to "How To Find Ip Of Amcrest Camera"
Post a Comment